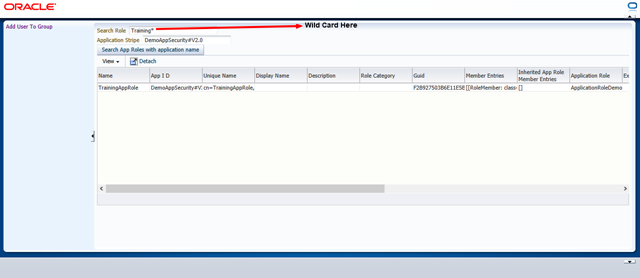
Earlier, I had covered an example here, which showed how to dynamically create users and map the application roles to enterprise groups. In this post, the sample application is extended to show how you can query the application roles from the application stripe(application specific policies). To query the application specific roles, you need to access the application's policy from policystore and then you can either directly invoke searchRoles(String roleName) or searchRoles(String attributeToSearchRolesBy,String attributeValue,String equalityOrInequalityFlag). The response from the method is a List<AppRoleEntry>. The snippet below shows the code for doing so. Note that although there is another much more flexible method to search across application stripes by using policyStore.getAppRoles(StoreAppRoleSearchQuery obj), It is not implemented for the embedded policy store and throws UnsupportedOperationException.
1 2 3 4 5 6 7 8 9 10 11 12 13 14 15 16 17 18 19 20 21 22 23 24 25 26 27 28 29 30 31 32 33 34 35 36 37 38 39 40 41 42 43 44 45 46 47 48 49 50 51 | /** * Given a application stripe name and rolename this can be used to search for a role name * This method performs a wildcard search also. * @param roleName the rolename to search * @param applicationStripeName the application stripe name */ public List<AppRoleEntry> searchAppRoleInApplicationStripe(String roleName, String applicationStripeName) { JpsContext ctxt = IdentityStoreConfigurator.jpsCtxt; PolicyStore ps = ctxt.getServiceInstance(PolicyStore.class); ApplicationPolicy policy; try { policy = ps.getApplicationPolicy(applicationStripeName); return policy.searchAppRoles(ApplicationRoleAttributes.NAME.toString(),roleName,false ); } catch (PolicyStoreException e) { throw new RuntimeException(e); } } ...... private static final class IdentityStoreConfigurator { private static final JpsContext jpsCtxt = initializeFactory(); private static JpsContext initializeFactory() { String methodName = Thread.currentThread().getStackTrace()[1].getMethodName(); JpsContextFactory tempFactory; JpsContext jpsContext; try { tempFactory = JpsContextFactory.getContextFactory(); jpsContext = tempFactory.getContext(); } catch (JpsException e) { DemoJpsLogger.severe("Exception in " + methodName + " " + e.getMessage() + " ", e); throw new RuntimeException("Exception in " + methodName + " " + e.getMessage() + " ", e); } return jpsContext; } } .... |
You can also do various other operations on the policy store and alter the application specific policies, once you have access to those operations. A key thing to note is these operations require specific PolicyStoreAccessPermissions to be granted in the jazn-data.xml. The steps to do so are mentioned below.
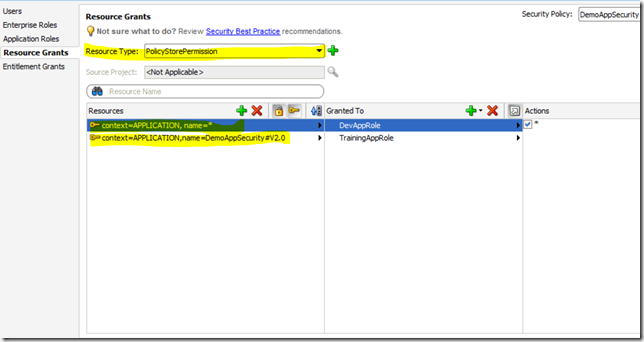
Define a resource type of permission class PolicyStoreAccessPermission and the neccessary actions that you want to grant access to (In this example,I am granting access to all operations, signified by *). The snippet is shown below:-
1 2 3 4 5 6 7 | <resource-type> <name>PolicyStorePermission</name> <matcher-class>oracle.security.jps.service.policystore.PolicyStoreAccessPermission</matcher-class> <actions>*</actions> </resource-type> | |
Next, create resources that are to be granted permissions. In this case, I have created two of them, the first one is the superset that allows access to all the application stripes and the next one grants access to only this applications's stripe. The snippet is shown below:-
1 2 3 4 5 6 7 8 9 10 11 12 13 | <resources> <resource> <name>context=APPLICATION, name=*</name> <type-name-ref>PolicyStorePermission</type-name-ref> </resource> <resource> <name>context=APPLICATION,name=DemoAppSecurity#V2.0</name> <type-name-ref>PolicyStorePermission</type-name-ref> </resource> </resources> | |
In the last step you have to assign these resources to the application roles or groups.
The enterprise identity store provider being used here is the embedded weblogic ldap, to run the application properly you will need to configure a password for it in weblogic and set the password in jps-config.xml as shown in the screenshot below.
To run the application, the username/password combination is john/oracle123. To view the search roles screen, either run the SearchRoles.jspx or click on the Search Roles link in the left navigation bar. The link to download the application is mentioned below:- Download the application.


