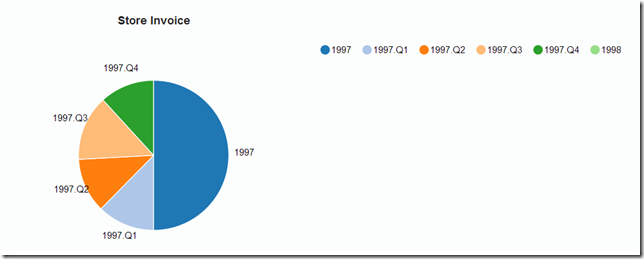
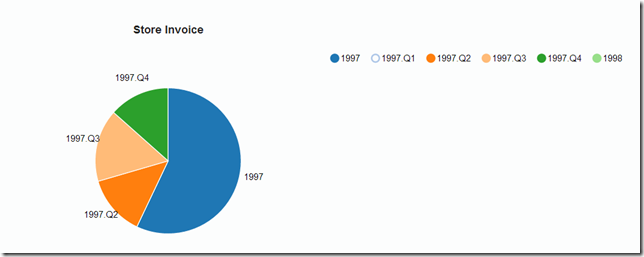
The in built primefaces charting components can be extended like any other faces component. In this post i will explain how to extend the in built pie chart component to use custom renderer which in turn will use NVD3 pie chart component. On a similar line you can similarly create your own custom faces component also.
The code is mentioned below.
1 2 3 4 5 6 7 8 9 10 11 12 13 14 15 16 17 18 19 20 21 22 23 24 25 26 27 28 29 30 31 32 33 34 35 36 37 38 39 40 41 42 43 44 45 46 47 48 49 50 51 52 53 54 55 56 57 58 59 60 61 62 63 64 65 66 67 68 69 70 71 72 73 74 75 76 77 78 79 80 81 82 83 84 85 86 87 88 89 90 91 92 | package com.blogspot.ramannanda.ui.chart; import java.io.IOException; import java.util.Iterator; import javax.faces.component.UIComponent; import javax.faces.context.FacesContext; import javax.faces.context.ResponseWriter; import org.primefaces.component.chart.UIChart; import org.primefaces.component.chart.line.LineChart; import org.primefaces.component.chart.pie.PieChart; import org.primefaces.component.chart.pie.PieChartRenderer; import org.primefaces.model.chart.PieChartModel; public class NVD3PieChartRenderer extends PieChartRenderer { @Override public void encodeEnd(FacesContext context, UIComponent component) throws IOException{ PieChart chart = (PieChart) component; encodeMarkup(context, chart); encodeScript(context, chart); } @Override protected void encodeScript(FacesContext context, UIChart uichart) throws IOException{ ResponseWriter writer = context.getResponseWriter(); PieChart chart = (PieChart) uichart; String clientId = chart.getClientId(context); String d3Id=chart.getClientId(context); d3Id="pieChart"+d3Id.substring(d3Id.lastIndexOf(":")+1, d3Id.length()); startScript(writer, clientId); encodeData(context,chart); writer.write("nv.addGraph(function() {"+ "var chart =nv.models.pieChart()"+ ".x(function(d) { return d.key })"+ ".y(function(d) { return d.value })"+ ".color(d3.scale.category20().range())" + ".margin({top: 30, right: 30, bottom: 30, left: 30});"); writer.write("d3.select('#"+d3Id+" svg')"+ ".datum(mydata"+d3Id+")"+ ".call(chart);"); writer.write("nv.utils.windowResize(chart.update);"); writer.write("return chart; });"); endScript(writer); } @Override protected void encodeData(FacesContext context, PieChart chart) throws IOException { ResponseWriter writer = context.getResponseWriter(); String d3Id=chart.getClientId(context); d3Id="pieChart"+d3Id.substring(d3Id.lastIndexOf(":")+1, d3Id.length()); writer.write("var mydata"+d3Id+"=[" ); PieChartModel model = (PieChartModel) chart.getValue(); for(Iterator<String> it = model.getData().keySet().iterator(); it.hasNext();) { String key = it.next(); Number value = model.getData().get(key); if(value==null){ value=0; } writer.write("{key:'" + escapeText(key) + "',value:'" + value + "'}"); if(it.hasNext()) writer.write(","); } writer.write("];"); } @Override protected void encodeMarkup(FacesContext context, UIChart chart) throws IOException { ResponseWriter writer = context.getResponseWriter(); String d3Id=chart.getClientId(context); writer.startElement("div", null); writer.writeAttribute("id", "pieChart"+d3Id.substring(d3Id.lastIndexOf(":")+1, d3Id.length()), null); if(chart.getStyle() != null) writer.writeAttribute("style", chart.getStyle(), "style"); writer.writeAttribute("class", "chart1", "styleClass"); writer.writeAttribute("align", "center", "align"); writer.startElement("h3",null); writer.writeText(chart.getTitle(),null); writer.endElement("h3"); writer.startElement("svg",null); writer.endElement("svg"); writer.endElement("div"); } } |
If you had followed the previous intro to d3.js and you are aware with JSF, this code sample should be easy to follow. Basically we create a div element with the client id and then svg element under it, we then do a selection of the svg element under the div. Here the thing to note is that we are using datum function rather than data function, whereas the data function computes a join, datum function just binds the data to the existing element and does not compute the join.
To register the renderer add the following into faces configuration file.
1 2 3 4 5 | <renderer> <component-family>org.primefaces.component</component-family> <renderer-type>org.primefaces.component.chart.PieChartRenderer</renderer-type> <renderer-class>com.blogspot.ramannanda.ui.chart.NVD3PieChartRenderer</renderer-class> </renderer> |
Also make sure to include the following files as they are part of nvd3 and d3 libraries into your *.xhtml page.
1 2 3 4 5 6 7 8 9 10 11 12 13 14 15 16 17 18 19 20 21 22 23 24 25 26 27 28 29 30 31 32 33 34 35 | <link href="../src/nv.d3.css" rel="stylesheet" type="text/css"> <script src="../lib/d3.v3.js"></script> <script src="../nv.d3.js"></script> <script src="../src/models/legend.js"></script> <script src="../src/models/pie.js"></script> <script src="../src/models/pieChart.js"></script> <script src="../src/utils.js"></script> <script> <style type="text/css"> body { overflow-y:scroll; overflow-x:scroll; } text { font: 12px sans-serif; } svg { display: block; } .chart1{ padding:10px; min-width: 150px; min-height: 150px; } </style> |
And this is how the pie chart component now looks. You can select which data to show and the state of the pie chart changes to whatever data is selected along with a nice transition effect. Cool uh ?.

